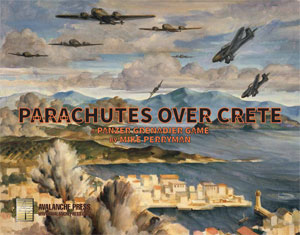
Parachutes over Crete:
Scenario Preview, Part Four
by Mike Bennighof, Ph.D.
December 2019
 For some reason, in our last installment I only included half of the scenarios from Chapter Three of Parachutes Over Crete. At least that lets us give the rest of them a little more attention. For some reason, in our last installment I only included half of the scenarios from Chapter Three of Parachutes Over Crete. At least that lets us give the rest of them a little more attention.
I had to take over development of Panzer Grenadier: Parachutes Over Crete myself, something I didn’t really want to do, but it does give me a more intimate familiarity with it than I enjoy the Panzer Grenadier titles that I didn’t design myself (that would be most of them). I designed the Panzer Grenadier system for this sort of game: intense, closely-fought infantry engagements. They’re made extra chaotic by the parachute drops, even in scenarios where the Germans are already on the ground - the opposing forces are often intermingled, forced to sort themselves out at the same time they’re fighting enemies on all sides.
So let’s have a look at the scenarios left out of the Chapter Three preview, and some from the tail end of the campaign that didn’t fit with any of the other chapters.
Scenario Nineteen
Cemetery Hill
21 May 1941
While the Germans lacked the strength to do much more than hold on and wait for the forces from Maleme to arrive, from their positions on Cemetery Hill they harassed the New Zealand Divisional Cavalry with mortar and machine-gun fire. Major J.T. Russell asked that someone be sent up the hill to drive away his tormenters, and Kippenberger detailed a company from 19 Battalion and some tanks to conduct a local counter-attack.
Conclusion
The tanks held off, contenting themselves with spraying machine-gun fire on the hill while the New Zealand infantry charged up the slope. Rather than engage with bayonet-wielding Kiwis, the paratroopers withdrew and dropped mortar bombs on their former positions. “The hill was completely bare,” Capt. Brian Bassett wrote, “with no cover, and their range and observation were excellent. Poor devils were blown up all around us and we had to pull off carrying fellows with their chests blown in and bloody stumps where their fore-arms had been.”
Notes
This is a rather small scenario, a pretty intense fight in close quarters. The Germans are on the hilltop, and the Kiwis want to knock them off it. They have numbers and a fairly useless tank; the Germans have a hilltop.
Scenario Twenty
Captain Forrester
22 May 1941
 The third day of the German landings in Prison Valley passed with both sides conducting patrols but not seeking action with one another. That changed as evening approached and the Germans made a determined effort to occupy the high ground known as Pink Hill. Neither side had anyone atop the hill, and so brigade commander Lt. Col. Howard Kippenberger personally led his scanty reserve up the slope in a bid to drive them off. The third day of the German landings in Prison Valley passed with both sides conducting patrols but not seeking action with one another. That changed as evening approached and the Germans made a determined effort to occupy the high ground known as Pink Hill. Neither side had anyone atop the hill, and so brigade commander Lt. Col. Howard Kippenberger personally led his scanty reserve up the slope in a bid to drive them off.
Conclusion
“It was a most inspiring sight,” Driver A.Q. Pope, pressed into the fighting as an infantryman, wrote later. “Forrester was at the head of a crowd of disorderly Greeks, including women; one Greek had a shot gun with a serrated-edge bread knife tied on like a bayonet, others had ancient weapons—all sorts. Without hesitation this uncouth group, with Forrester right out in front, went over the top of a parapet and headlong at the crest of the hill. The enemy fled.”
Notes
Designer Mike Perryman can be counted on to include at least one really odd and fun scenario in a game. In this one, Captain Forrester is pretty much a combination of Captain Scarlet, Harry Paget Flashman and John Carter of Mars. His Greek friends will follow him into hell armed only with a bucket of ice water.
Scenario Twenty-One
Stalos
23 May 1941
The seaside village of Stalos lay just west of Canea. If the Germans coming from Maleme were to link up with those in Prison Valley, they would need to come through Stalos. When Greek scouts reported that some of the Germans in Prison Valley had occupied Stalos, Kippenberger ordered an attack to drive them out.
Conclusion
The New Zealanders cleared all of the Germans out of Stalos except for one machine-gun position that stubbornly resisted all assaults. With patrols reporting growing German strength in the nearby hills, the New Zealand battalion pulled out of Stalos, leaving it in German hands.
Notes
Engineers can do anything, or so they claim, and in this scenario they have to defend themselves from a kitchen-sink attack as the New Zealanders hurl all the rear-area troops they can muster against them. The engineers have morale on their side, while the Kiwis are, well they’re Kiwis. They’re always up for a fight.
Scenario Thirty-Seven
Maori Bayonets
27 May 1941
On the 27th, Creforce commander Maj. Gen. Bernard Freyberg informed Middle East Command that Crete could not be held. Worn and tired New Zealand and Australian battalions took up a new defensive line south of Suda Bay, along a dirt road the dubbed “42nd Street.” Lt. Col. George Dittmer of the 28th “Maori” Battalion told his fellow commanders that he intended to allow the Germans to approach his positions, fire a short-range volley and then charge with the bayonet.
Conclusion
The 141st Mountain Regiment, part of the 6th Mountain Division, had only just landed on Crete and entered action when it met the crazed ANZACs. Just which battalion first went berserk and charged the Germans is disputed - all three battalion commanders made the claim in their after-action report. The Maoris paused first to perform a brief haka before attacking and so were probably not the first to charge. What is clear is that the three battalions assaulted the advancing jägers within minutes of one another, inflicting about 400 casualties. The “Bayonet Charge at 42nd Street” became part of the military lore of both nations.
Notes
This is another scenario marked by fun special rules: the Aussies, Kiwis and Maoris are initially on the defensive, but when the Germans appear they’ll go berserk and attack them. The New Zealand player doesn’t actually have to eliminate German units to win - his or her task, just as it was in the actual event, is to hold back the German advance - but there’s going to be lots of close combat all the same.
Scenario Thirty-Eight
Caught Napping
28 May 1941
 Reprimanded by his division commander for poor performance in his first action on Crete, Col. August Krakau of 85th Mountain Regiment drove his troops hard through the rough country south of the coastal road. The battered 5 New Zealand Infantry Brigade had pulled back to what was thought a safe rear area to finally rest from days of hard combat. As the Kiwis bedded down following a night march, Krakau’s troops unexpectedly appeared on their flank. Reprimanded by his division commander for poor performance in his first action on Crete, Col. August Krakau of 85th Mountain Regiment drove his troops hard through the rough country south of the coastal road. The battered 5 New Zealand Infantry Brigade had pulled back to what was thought a safe rear area to finally rest from days of hard combat. As the Kiwis bedded down following a night march, Krakau’s troops unexpectedly appeared on their flank.
Conclusions
Krakau’s men reached the New Zealand positions as dawn approached, just as the men were bedding down after their march. Two New Zealand lieutenants spotted the assembling Germans and roused the men just in time to meet the assault. “The strong enemy force at Stilos was taken by surprise,” the mountain regiment reported. “A terrific struggle developed, including bloody hand to hand fighting.” The New Zealanders withdrew in good order with the Australians on their left flank following shortly afterwards.
Notes
The Germans catch the tired Kiwis by surprise, but they recover quickly - and they include Maoris. The Germans have a lot of advantages here, but they’re also expected to inflict a lot of damage so Col. Krakau can redeem himself.
Scenario Thirty-Nine
Corinith
26 April 1941
With the Allied Force W retreating from Greece, Adolf Hitler personally ordered an airborne assault on the Corinth Canal to cut them off from the ports of southern Greece.
The canal had only one bridge over its entire length and was deep with almost vertical sides. This made the bridge the only practical way to move large numbers of men over the canal. Gen. Alexander Lohr of Fourth Air Fleet quickly organized a combined parachute-glider assault to carry out the supreme leader’s directive.
Conclusion
The bridge exploded, but just how the explosives were detonated is open to debate. The defenders made no claim for blowing the bridge even after their officers were subjected to intense interrogations by the Germans after the battle. The glider troops were cutting the fuses when they exploded, killing them and destroying the bridge. Some Germans claimed two Allied officers ran forward firing their pistols into the explosives, sacrificing their lives to destroy the bridge. British engineers maintained that even a hit from a small-caliber bullet would set the explosives off. Capturing the bridge intact was of no strategic importance, and the Germans captured over 900 Allied soldiers in the area along with 1,450 Greek soldiers who did not take part in the fighting.
Notes
This battle, of course, did not take place on Crete but about a month earlier. It’s a fairly complex one, as it was a complex operation, hinging on a bridge that the Kiwi defenders will try to destroy if they can’t hold it. The Germans have to land right on top of alerted defenders, who aren’t very numerous but are battle-ready despite the looming danger of some pretty serious communications problems.
You can order Parachutes Over Crete right here.
Sign up for our newsletter right here. Your info will never be sold or transferred; we'll just use it to update you on new games and new offers.
Mike Bennighof is president of Avalanche Press and holds a doctorate in history from Emory University. A Fulbright Scholar and NASA Journalist in Space finalist, he has published vast numbers of books, games and articles on historical subjects.
He lives in Birmingham, Alabama with his wife, three children and his dog, Leopold. Leopold is not parachute-deployable.
|